In CERF you can substitute a different file as the official print copy for any file in a File Cabinet or Notebook. This will only change the printed copy (the resource in the Notebook and File Cabinet is unchanged). This may be necessary if the printed version of the file isn’t optimal or cannot be printed. The printed copy and the metadata will show that it is an Official Printed Copy and it will not change or replace the file that is in your Collection (i.e., it will only be used for printing).
Example 1:
Select the Notebook Entry in the Notebook Viewer and click on the Set Official Copy button ![]() in the Entry Toolbar. From the menu select the source for an Official Printed Copy:
in the Entry Toolbar. From the menu select the source for an Official Printed Copy:
- From Screenshot – minimizes application and allows you to select and capture a screenshot. Before choosing this option, have the image or file open so that you can select it. When you make this selection, the CERF application will be minimized and your cursor will turn into a selection tool. When you create the official printed copy, you’ll have the option to view it on the Notebook Page.
- From File – launches a file chooser dialog so you can select a file from your computer
- From Resource – launches a CERF Search dialog, so you can search for and select an existing CERF resource

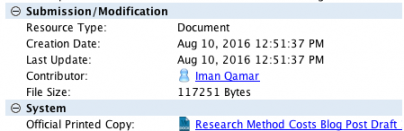
After selecting the Official Printed Copy, a new icon is shown next to the Resource showing that it has an Official Printed Copy:

The metadata for this resource show that it has an Official Printed Copy:
Example 2:
You can use an image file in a File Cabinet as the Official Printed Copy for an image file on a Notebook Page. Simply drag a resource (in this case from the File Cabinet) and drop it onto the resource in the Notebook that you want to print (in this case, drop one image file on top of the other image file). This launches the Paste Resource dialog. Select Paste Official Printed Copy and click Paste.
View Official Printed Copy Inline
Once you’ve added a resource as an Official Printed Copy to a Notebook Entry, you can change the display type (using the drop-down menu on the Entry Toolbar) to display the Official Printed Copy inline.

Printing
After you have set an official printed copy, right-click again on the Section or Page you wish to print and select Print to PDF (or click on the Print button). If you have printed this earlier, a dialog is launched informing you that an existing printed copy has been found. If you are printing this with an official printed copy for one or more entries, click on Print New Copy. This may inactivate the previous (existing) printed copy, depending on the business policy settings for your organization. The printed copy will show the Official Printed Copy, and it will be labeled as such.
Remove Official Printed Copy
Simply right-click on the resource and select Print | Remove Official Printed Copy.
< Printing up Print PDF to Word >