You can change the sort order for File Cabinet and Notebook resources. However, in Notebooks, the manual sorting and the ability to save a sort order is only an option in Flexible Notebooks. You can find out if the Notebook you are working in is Flexible by selecting it in the Document Tree and opening the Info Panel on the right-hand side of the application (look in the Status Pane).
Folders, Notebook Sections, and Notebook Pages can be sorted alphabetically (forward and reverse), by creation date (forward and reverse), update date (forward and reverse) and, if your access role permits manual sorting (i.e., File Cabinet Manager, Notebook Creator, Notebook Editor) you may sort manually. When a sort order is saved, subsequent resource additions will follow the sort rule.
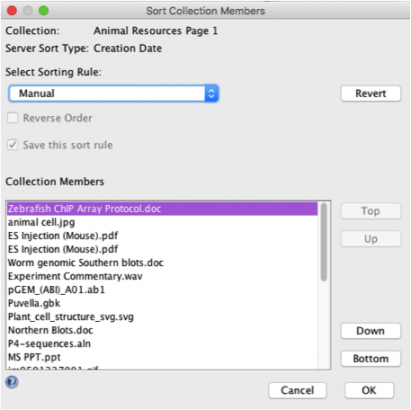
Right-click on a collection or folder and select Edit > Sort. This launches the Sort Collection Members dialog shown in the next image. The resources in the selected collection are displayed in this dialog and are in the same order as in the CERF Document Tree
Manual Sorting
- If the collection and your access role permits manual sorting, select this sorting rule from the drop-down list. The manual sorting rule and settings are automatically saved from one session to the next.
- For manual sorting, select a resource in the list and use the Up/Down buttons to move the resource up or down one step at a time; use the Top/Bottom buttons to move the resource to the top or bottom of the list; or use drag and drop.
- Click on OK when the list is sorted as you want it. Click Cancel to discard these changes. This closes the dialog and the CERF Tree will refresh to show the new sort order.
- Note that the Revert button reverts to the sort order stored on the server (alphabetic).
Alphabetic, Creation Date, Update Date
- Repeat step 1 (above)
- The Server Sort Type will show the previous sorting method used during this session of CERF if the sort rule was saved.
- Select a new sorting rule (not manual).
- Select checkboxes if you want the order to be reversed and if you want to save this sort rule.
- Click OK or Cancel. Revert causes the rule to be alphabetic.
Note that for Notebooks, if you previously created a printed copy of a collection, this printed copy will be invalidated after you sort the collection and save the new sort order.
Sort Collections
Mounted Collections
- Select Collections > Sort Collections from the main menu
- This launches the Sort Collection Members dialog. The dialog shows all the collections mounted in the Document Tree. This example illustrates Manual sorting. Select a collection displayed in the dialog and use the buttons to move it up or down or to move it to the top or bottom of the list. Click OK when you are finished.
- The manual sort order can be saved from one session to the next by selecting the checkbox for Save this sort rule. Other sorting rules are available from the drop-down menu: alphabetic, creation date, and update date.
- The new sort order will be displayed in the CERF Document Tree.
Bookmarks
Bookmarks are also grouped and treated as a collection. Click on the Sort button.
Note that SOPs can be filtered and Notifications can be grouped to change the display.
< Show/Hide Collections up Editing >