Where are the checked out resources and temporary files stored on my computer
Signatures failed on at least one member of this collection.
Signature pending icon displayed when all signatures completed
Note for M2+ Apple Silicon right-click issue
Signature Images print as a black box
Can I link to external files from CERF
What happens if I try to print the same Notebook Page a second time?
How often are users asked to change their passwords?
Privileges in Shared File Cabinets
Search for Image Annotations
Maintaining tabbed indents in a text Entry
Can I Change the Signature Workflow on a File Cabinet or Notebook?
Troubleshoot login failure
Can I delete a Notebook Page I added by mistake?
Copying Content with Images to Notebooks
Enable Deletion in the Notebook
Disconnect from CERF Server
Can others access a file when I have it checked out?
How do I view a file without checking it out for editing?
Entry signed as witness instead of approver
How can I print or show sample data from within a large spreadsheet file?
Can I edit the dictionary used in the CERF HTML Notebook Entry?
Popup message stating “Error co-signing resource” when attempting to CoSign a Notebook Page
The fonts or other interface elements are too small to see
Logging out of the CERF Desktop client is slow
Error when creating new Audio Entry
Where are the checked out resources and temporary files stored on my computer.
When you Checkout a resource, View a resource in External Application or view a Network File Link from the Resource Info panel, CERF Desktop downloads a copy of the resource to your local workstation. This location will be in the OS user’s Home folder in a hidden folder titled .cerf (note, you may need to enable viewing of hidden items in your OS file explorer)
The typical locations will be (replace [OSUSERNAME] with your OS login user name):
- Windows – C:\Users\[OSUSERNAME]\.cerf
- MacOS/Linux – /Users/[OSUSERNAME]/.cerf
** Contents of this folder should not be modified without guidance from Lab-Ally Support, otherwise there may be a loss of data or out of scope support fees applied. **
Inside this folder will be a Servers folder. Inside the Servers folder will be a named folder for any name CERF connection created from the CERF Desktop Login > Edit Servers dialog. Within the named server folder will be a folder for any CERF user that has connected to CERF on this workstation. Within each CERF user folder will be a Checkout and Temp folder. Sample path may look like the following:
.cerf\Servers\demo.cerfnotebook.com\jdoe\Checkout
.cerf\Servers\demo.cerfnotebook.com\jdoe\Temp
Checked out resources will be in the Checkout folder and any resources that are viewed will be in the Temp folder. The checked out resources will remain in the Checkout folder until the user checks the resource back in. The viewed resources in the Temp folder are only temporarily stored and will be removed the next time the CERF application is opened.
Note: Checked out resources can only be edited or checked in from this same OS user login on this workstation. If you login with a different OS username or work from a different computer you will not see the checked out resource. You must login to the same workstation where the resource was checked out.
Signatures failed on at least one member of this collection.
You may see a dialog with this message when attempting to sign a Notebook Page if you have a “Linked” resource from another Collection. You will need to first fully sign the linked resource in all contexts. You can find the other locations this resource is linked to by right-clicking and choosing Search > Locations. If you are unsure which resource was linked, you will need to expand all entries and Search > Locations on each Entry Content resource file. You might be able to ask your CERF administrator to review the server log to get the CERF Resource ID number of the resource in question. The Log will state text similar to the following (your number will be different): Failed Signatures on resource ID : 1864
Signature pending icon displayed when all signatures completed
Q: After all users have signed a Notebook Page, the Signature Icon still shows as pending. When I review the Resource Info for the page, the Signature block shows that all users have full signed the page. How can I fix this issue?
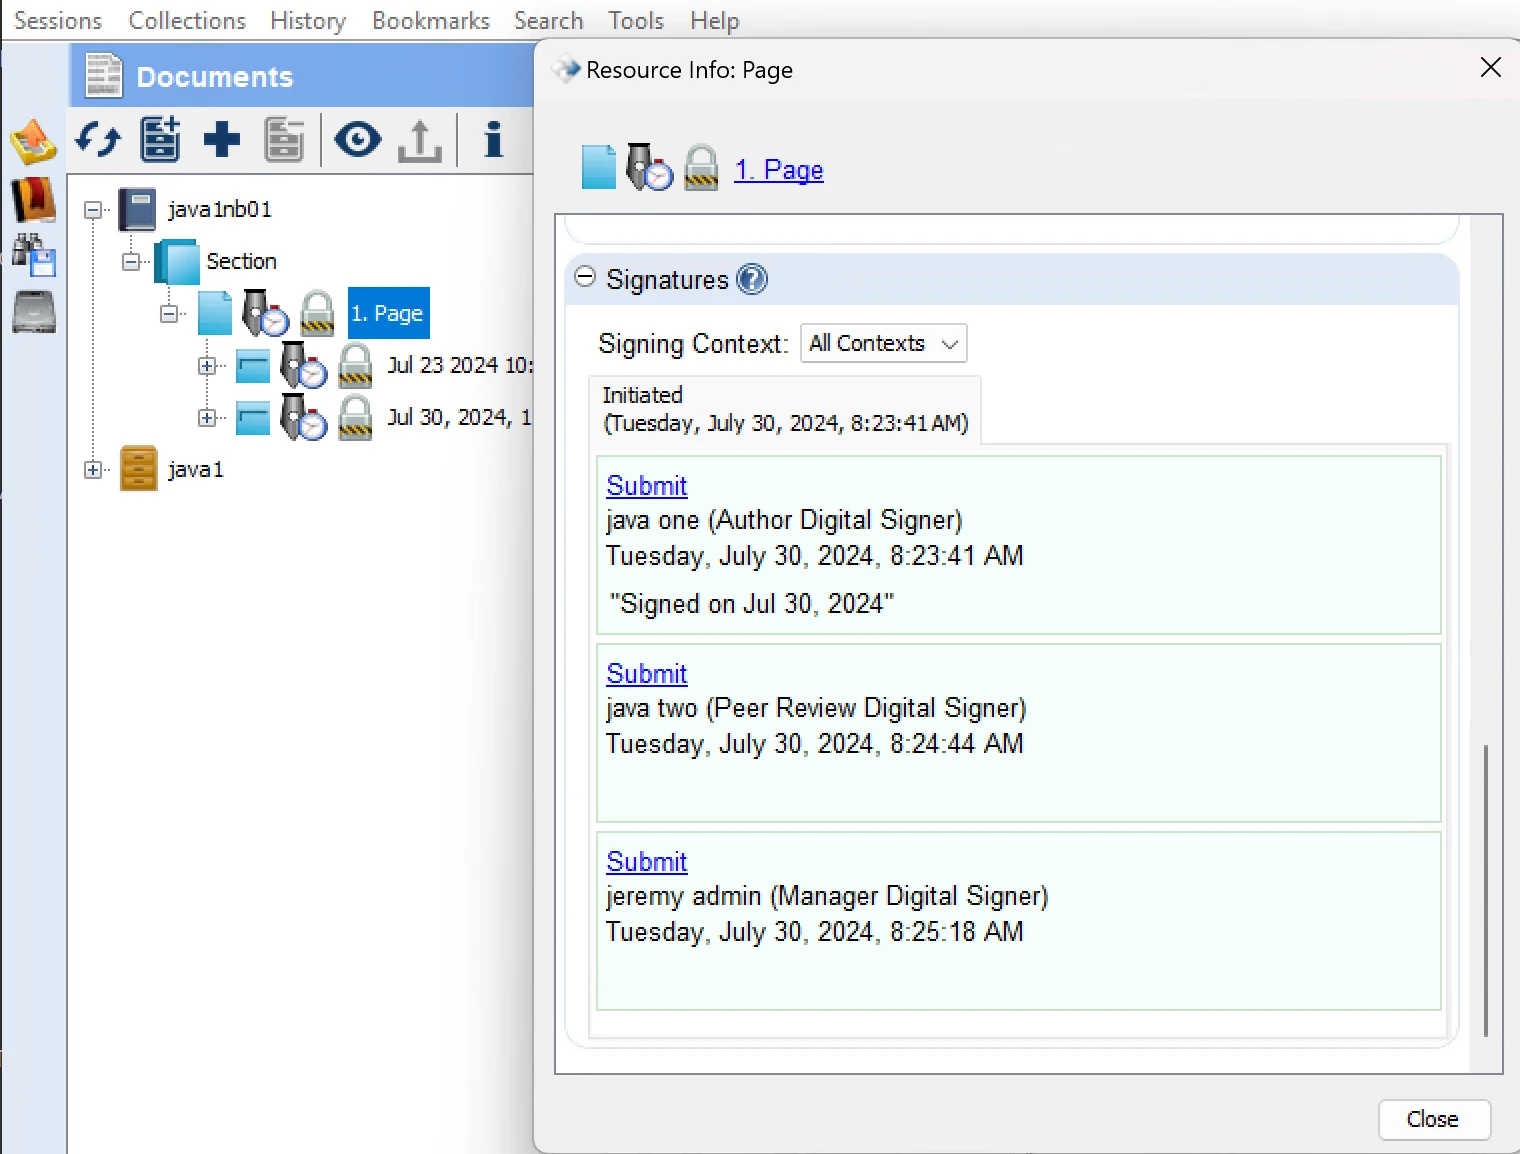
A: This situation can occur when multiple users have edited entries on the page and the user that initiates the Signature workflow adds that user as a Peer Review or other cosigner group member. When multiple users edit entries, CERF automatically will add the additional users as Co-Author Digital Signers. The user that Initiates the signature workflow does not need to add these co-authors manually when choosing Peer Review, Manager, etc co-signers. If the initiating user adds the co-authors manually, this will add an extra count to the total of expected digital signatures.
Example:
- User One creates a Notebook page and adds an entry
- User Two adds an entry to the page and then right-click’s on the page and chooses Notebook > Finalize My Entries.
- User One then initiates the Signature workflow and adds User Two as Peer Reviewer.
- CERF in the background computes the expected count as follows for a total of three:
- User One counts as one for their entry
- User Two counts as one for their entry as Co-Author
- User Two counts as one additional when User One added them as Peer Reviewer
What happens then is User One and Two fully sign for a count of two signatures, however CERF is expecting a count of three signatures.
How to Fix:
User One should still have the opportunity to right-click on the page in question, then click on Digital Signatures > Cancel Signatures. If this is not the case, then there may be some other issue that will require Lab-Ally Support to review the page and backend SQL database.
Note for M2+ Apple Silicon chips
On laptops with a track pad, you may encounter and issue with 2 finger tap right-click menus not working. This because the CERF 5.3 Client is running under emulation mode using Rosetta on the M2 and above Apple Silicon chips. The current work-around for CERF 5.3 users is to hold the Control key and then left-click on the resource. Be sure to press the trackpad down to click, the touch click will not work. The other option is to use a physical mouse with normal left and right click buttons.
Initial tests on one of our new 2024 M4 laptops, the 2 finger tap option appears to be working as expected.
Signature Images print as black box
This can occur if there is an alpha channel saved in a PNG version of your image. Try a different image format or remove the alpha channel with an image editing program like MacOS Preview, Gimp or Microsoft Paint
Can I link to external files from CERF?
Yes, there are several ways to do this in CERF.
- To create a link from a CERF resource to a file that resides on an external SMB filesystem, follow these instructions. This creates a link that is displayed in the Relations and Annotations pane of the Info panel or popup.
- You can also create hyperlinks within a cerfht file (usually a CERF text entry within a Notebook). Use these links to point at web pages or external files on your computer or network. Links to external files will only work when you are using CERF on the same computer you used to create the link or from a computer where you have normal access to the external file via the same drive paths.
Here’s how to do this:- Type something in the text editor (e.g, it might be the name of the file, the file path or any text you like).
- Highlight (select) what you’ve typed, and click on the “link to external file” button on the text editor toolbar (circled below).

This launches the Hyperlink Properties dialog: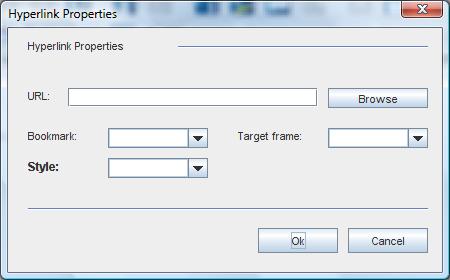
- Click on browse to locate the file of interest, select the file and click “Open” on the file chooser dialog.
- Click “OK” on the Hyperlink Properties dialog to create the link.
- Click on “Create Entry” (or if you are editing an existing text entry, click on “Save and Check In”). Click on the link in the text entry to open the file or web site. Keep in mind that if this link points at a local file, it will not work if you are working from a different computer.
- You can also use the right-click > “Edit > add relation > URL Link” function to associate CERF resources with resources on the Internet. Just enter the URL and click OK. With this method, the clickable link appears as an annotation in the info panel or popup.
What happens if I try to print the same Notebook Page a second time?
Question:
I printed a Notebook Page that I must have printed earlier because a dialog told me that a previous printed copy existed. I went ahead and printed it again. Now when I look in the Notifications pane, I see that the previous printed PDF has an icon “I” on it and I can’t open it. What happened?
Answer:
If you make any changes to a Notebook resource that has already been printed, a dialog informs you that a printed copy exists. If you choose to print a new copy, the previous copy is inactivated (if the default business policy has not been changed).
How often are users asked to change their passwords?
Question
One of our users was asked to select a new password for their CERF account. Is this a regularly timed request?
Answer
This feature is determined by the Business Policy setting. An admin can configure the number of days after which passwords will expire, as well as the number of days before expiration that a user will receive a warning message. Business Policy settings apply to the entire organization and can be edited by selecting Settings in the left pane of the CERF Admin web page.
A user will also be asked to change password after the CERF System Administrator has manually reset his or her password. This is a security feature that ensures that only the user knows his or her password.
Privileges in Shared File Cabinets
Question:
In our Research group there are several Public File Cabinets that we use for Protocols. I am unable to create new Folders or check out any of the resources in this File Cabinet.
Answer:
When the System Administrator sets up user accounts, the default Public Access Role is “Guest,” which confers read-only privileges. To see what your access role is in this Public File Cabinet, select the File Cabinet and open the Resource Info tab. The information to review is displayed in the Status pane. If your role is Guest, you will not be able to create folders, add resources, or edit. For that level of collaboration, it’s best to ask your System Administrator to set up a Workgroup for your research group and give each member of the workgroup roles that will allow them to perform specific functions.
Search for Image Annotations
Question
I created an image annotation that included a label. A search for the text on the label did not return results. How do I find this annotation using search?
Answer
Image annotation titles are currently indexed for search, whereas image annotation labels are not. Thus when you create an image annotation, its title should include words that will help you find any labels you added to the image when you annotated it.
Maintaining tabbed indents in a text Entry
Question:
After using the tab function to indent a line in the text editor, when I hit the ENTER key for a hard return, the text in the next line is still indented. How can I undo the tab function?
Answer:
Use the formatting buttons in the text editor. For the line that you want to “untab,” keep the cursor on that line and then press DECREASE INDENT and the line will be “untabbed.”
Can I Change the Signature Workflow on a File Cabinet or Notebook?
Question:
Once a File Cabinet or Notebook is created is there a way to change the Digital Signature Workflow?
Answer:
No, the Signature Workflow is set up at the time a File Cabinet or Notebook is created. Any change in the signature workflow could possibly invalidate pending signatures, etc. and as such was deemed a potential risk to 21CFR11 compliance.
Troubleshoot login failure
Question:
A user cannot log in using their credentials in the Desktop client, however they can log in to CERF from the web client with their credentials.
Answer:
Check that the user is a member of their own (personal) workgroup. If not, add the user back to their personal workgroup.
Can I delete a Notebook Page I added by mistake?
Question
I created a new Notebook page by mistake and I’d like to delete it. This is a flexible Notebook.
Answer
In a flexible Notebook, you may delete the contents of a Notebook Page, but the Page itself cannot be removed. You can use the page later or keep it blank. Note that the business policy for your organization must allow deletion in order to remove page content. For more information, see the help topic on deletion in flexible Notebooks.
Copying Content with Images to Notebooks
Question:
I created a notebook Entry by selecting content from an outside source (in this case an internal MediaWiki page) and dragging it in to a Notebook Page. This worked well, and it retained most of the formatting. However, when I printed the notebook to a pdf, it didn’t print the images that were links (which is how MediaWiki displays all of its images).
Answer:
Issues with symbolic links are quite common when downloading and inserting media from the Internet into other files. The relative HTML link is accessible from your computer, so the image is viewable. However, the image is not in CERF. The CERF Notebook viewer is simply an HTML editor, and it does not distinguish between what is in CERF and what is simply accessible. If images are important to your notes it’s probably best to download the image to your local machine, then drag the image itself (not just a link that points at the image) into your CERF notebook or File Cabinet.
Enable Deletion in the Notebook
Question:
How do I enable users to delete entries in their notebooks?
Answer:
Set business policy NOTEBOOK_DEFAULT_COMPLIANCE_MODE to allow Flexible Notebooks. A Notebook must be Flexible if entries are to be deleted. Note that a Rigid Notebook cannot be changed later to a Flexible Notebook; it must be designated as Flexible at the time it is created.
Next, make sure that the business policy ACTIVITY_DELETED_PERMITTED is set to TRUE
Finally, the user’s access role in the workgroup that owns the Notebook must permit deletion.
Entries that have pending signatures or are checked out for editing may not be deleted.
Disconnect from CERF Server
Question:
What happens if I have checked out a Resource for editing and the connection to the CERF server is lost?
Answer:
When a Resource is checked out, you are working on a local copy. Thus, if you save your work as you go, nothing will be lost. In the event that the connection to the CERF server is interrupted or lost while you are working on the local copy, as soon as the server connection is restored and you log in to the CERF client, simply check in the Resource and your changes will be saved to the CERF server.
When the CERF client detects that the server is unreachable, for example a network issue, a popup message will inform the user and a 1-minute timer is displayed where CERF client will attempt to reconnect. The user does have the option to “Retry” before the timer expires. Once the connection is re-established the user can proceed as normal. If the connection cannot be established, the user can logout and continue working with the file locally.
Can others access a file when I have it checked out?
Question:
If I have checked out a resource for editing, can others access it?
Answer:
Anyone who belongs to the workgroup that owns the resource and who has an access role that allows viewing may view a read-only copy of the resource while it is checked out. While the resource is checked out from the server, the Checkout action will not be enabled on the right-click menu for workgroup members with access roles that permit editing. The red check-mark next to the resource will indicate that it is already checked out, and when the resource is selected, the Status pane (in the Resource Info tab) shows which user has checked out this resource. This can be important if someone forgets that a resource is checked out and others want to edit it.
Note that in cases in which someone leaves for a period of time and has left a resource checked out, the System Administrator can use “uncheckout” from the admin web client to make the resource accessible to others. This will cause all changes made by the user to be lost and the last known version will be available instead. It is recommended to have a company policy in place that user’s should checkin all work at the end of their shifts, unless circumstances require working with the resource offline from home.
How do I view a file without checking it out for editing?
Question
Sometimes when I am just trying to view a file, I discover that I’ve checked it out from the server by mistake. How does this happen? If I don’t want to edit it, how do I get it checked in again?
Answer
In CERF the default double-click action checks the file out from the server. You will know if something is checked out because it will have a red checkmark icon. If you inadvertently check out a file, just select it and click on the Uncheckout button ![]() in the Checked out Documents pane (My CERF tab) OR right-click on the document and select Edit > Uncheckout.
in the Checked out Documents pane (My CERF tab) OR right-click on the document and select Edit > Uncheckout.
To view a file without making edits, select the file in the CERF Tree and click on the View button ![]() to view it in the CERF file viewer within the center panel, or right-click on the document and select View In then choose either Center Panel, a New CERF Window or External Application to open a read-only copy of the file in a suitable external application.
to view it in the CERF file viewer within the center panel, or right-click on the document and select View In then choose either Center Panel, a New CERF Window or External Application to open a read-only copy of the file in a suitable external application.
If you want the double-click action to result in View rather than checkout and edit, you can set your own user preferences (Tools > Options). In the General Tab of the Options dialog, select View as the double-click action. You will need to restart the CERF client to see this change.
Note that double-clicking on a Notebook, a Section, or a Notebook Page in the CERF Tree will display the Notebook Table of Contents, the Section Table of Contents, or the Notebook Page in the Notebook Viewer center panel. Double clicking a File Cabinet or Folder will display the hierarchy of that item in the CERF File Viewer center panel.
Entry signed as witness instead of approver
Question:
An entry was cosigned, but the cosigner chose to sign as a “Witness” rather than an “Approve[r]”. What can I do to fix this? The entry needs to be cosigned as an approver.
Answer:
If the signing process is complete you can’t change anything other than copy the entry (right-click on it and select COPY) and paste it onto the page again and re-sign it. If the signing process has not yet been completed (e.g., if you still had one more person waiting to cosign it) you can cancel the signing process (again by right-clicking on it and selecting CANCEL from the SIGNATURE submenu) and then restart the whole signing process and make sure that the cosigner signs it using the appropriate setting by choosing “APPROVE” in the signing window.
How can I print or show a portion of interest, or sample data from within a large spreadsheet file?
Question:
I work with very large excel files that are difficult to display or print because the pagination process breaks up my spreadsheet into many pages. How can I print, or show in my notebook, (or show in the CERF file viewer), just a small, more manageable portion of the spreadsheet, or select a small area of representative data to display in CERF?
Answer:
Start by adding the spreadsheet to a File Cabinet in CERF.
There are a few ways to create a “sample” or image of a specific part of a large spreadsheet.
- Before you add the spreadsheet to the Notebook, open it in a read-only view, in an appropriate external application such as excel. Right Click > View In > External Application. Select the area of interest, and copy to the clipboard. Then, without closing the external excel window, right-click on the empty (white) part of a Notebook Page and select Edit > Paste. You should then see the the option to paste as either text or as an image. You can also add the complete spreadsheet to the same Notebook page as a live copy of the entire data data set in a separate entry.
- You can drag the spreadsheet file and drop it on top of the the image entry or text entry you created above and choose paste as a relation. This creates a link back to the document in the File Cabinet, so you will always be able to go back to the orginal data. The linked document will not print when you print the Notebook page, however (only the image of the selected portion will print).
- A third option is to add the entire spreadsheet file to a different Notebook Page, and then drag the image (that you created from the spreadsheet) on top of the file and choose to paste as an official printed copy. This Notebook page will contain the live spreadsheet data in its entirety, but the printout will show that there is an official printed copy and will print the selected portion that was created as an image.
- A fourth option is to checkout the spreadsheet for editing, then within MS Excel, select a print area and save. The file itself remembers the area you selected. Close the document and check in. Now when you ask CERF to either print to PDF or to display the spreadsheet in the CERF file viewer, or on a notebook page, CERF will ONLY display the portion of the spreadsheet that you specified. To once again print or display the whole spreadsheet, you will need to checkout and edit the file and re-adjust the print area using the MS Excel application.
Can I edit the dictionary used in the CERF HTML Notebook Entry?
Question:
I work with the CERF HTML Notebook Entry and have custom words I would like to add to the dictionary. Where can I add or edit these custom words?
Answer:
For each user, there is a default dictionary that is created when the CERF Desktop application is first opened after install. If the dictionary gets corrupted by the user for any reason, you can safely delete this file and a default copy of the dictionary will be recreated, however will no longer have your customized words. It may be helpful to periodically backup this file if you have a large set of customizations.
This text file is located in the hidden “.cerf” folder of the users Home directory. For example this file will be located at the following locations
- Windows user logged in as “labally”
- C:\Users\labally\.cerf\default_dictionary.dict
- MacOS user logged in as “labally”
- /Users/labally/.cerf/default_dictionary.dict
The dictionary file has a very specific formatting that must be retained in order to function correctly. Each letter of the alphabet will be the start of a new line (CR/LF). Each term/word is separated by a semi-colon. The last word should have a semi-colon at the end. The terms are used as suggestions in the order they are placed in the file.
For example, if you want the word “quantitative” added as the first suggestion in the CERF HTML entry, you can add the word in the front of the list of words for “Q”, so will line 17 of the document will appear similar to the following:
Q=;quantitative;qa;quack;quacked;
Save changes to the file in the “.cerf” folder and restart the CERF Desktop application to see the new suggestions appear.
I see a popup message stating “Error co-signing resource” when attempting to CoSign a Notebook Page
Question:
I have been asked to Co-Sign a Notebook Page, and after viewing the page in CERF and entering my Password I get the following dialog message with a Title of Signing Error and a message stating “Error co-signing resource”. What am I doing wrong?
Answer:
The most common cause when you see this error is using an incorrect Signature Password. If you have forgotten your password you can Change your Signature Password via the Manage Account menu option.
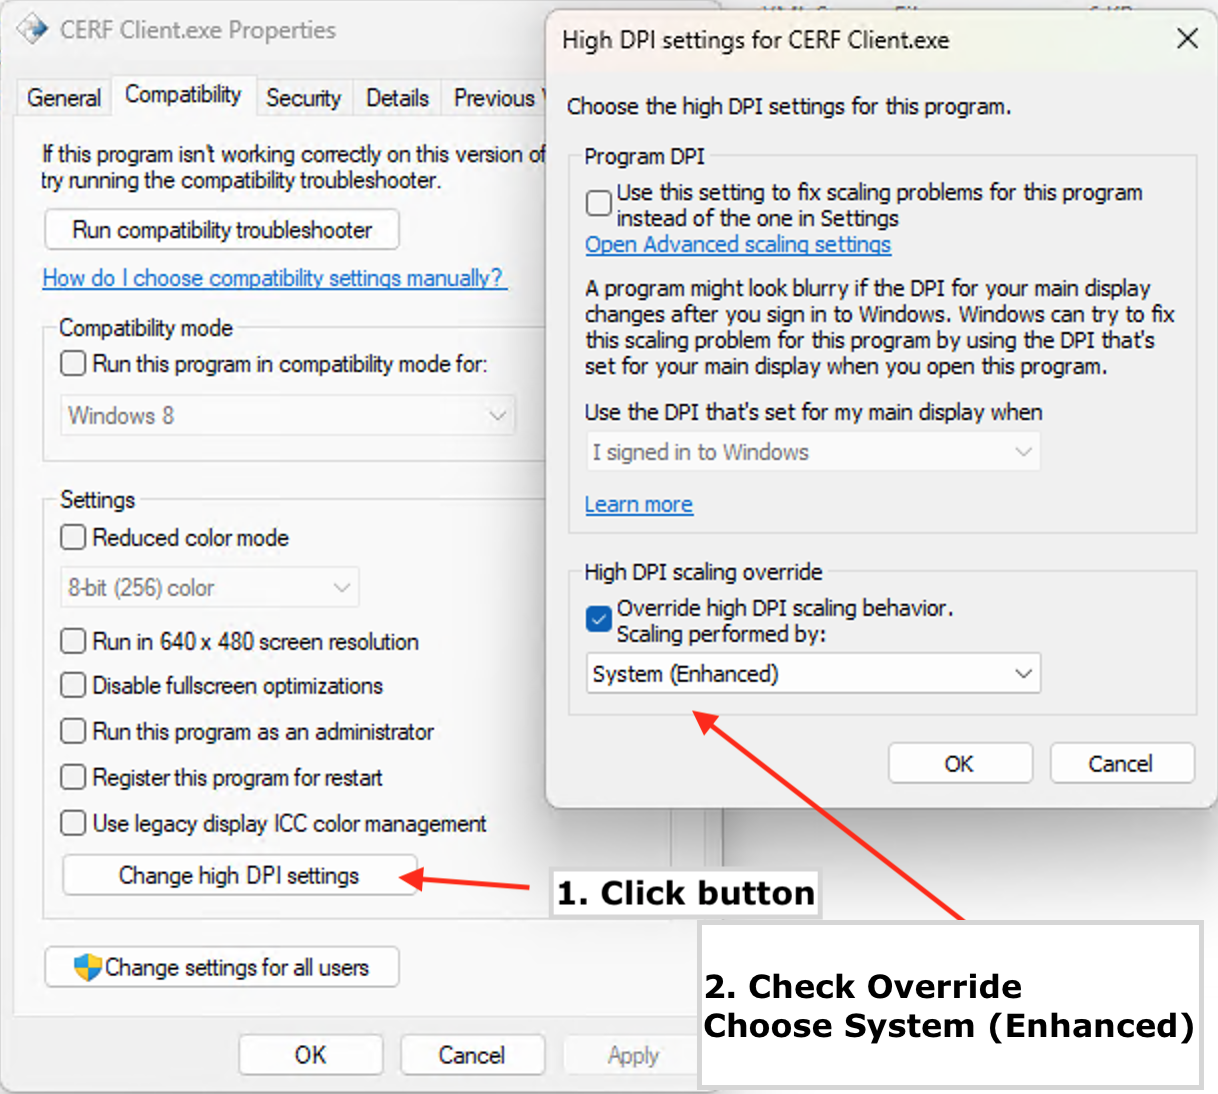
The fonts or other interface elements are too small to see, especially with Windows devices that use very high resolution displays.
Question:
The text in the Center Notifications Panel is smaller than the text in the CERF Tree and difficult to read. Other areas of the view, for example the Login dialog, the text is very small in comparison to other parts of the screen. I have a Windows Surface Pro 3 running Windows 10 and the screen resolution is set to 3000×2000
Answer:
In CERF Desktop versions 5.2 and prior, Java 8 is utilized to build the CERF Desktop applications. Java 8 does not provide a mechanism to allow our developers to adjust the DPI settings relevant to the user’s screen resolution. There are two options currently available to the user.
Option One:
The user can adjust the Display Profile for the computer to a different resolution that is not a 1.5 ratio. For example, 3000×2000 resolution has a ratio of 1.5, while 2560×1600 has a ratio of 1.6. Changing the display resolution affects all programs and likely satisfactory for most use cases.
Option Two:
The user can override the High DPI settings compatibility mode for CERF Desktop application separately. (Note: the user may need an IT Administrator to adjust these settings)
- Locate the CERF Desktop application: C:\Program Files\Lab-Ally\CERF\CERF Client\cerf-client.exe
- Right-click on the application and choose Properties.
- In the Compatibility tab, click the “Change high DPI settings” button
- In the High DPI Settings dialog, enable the checkbox for “Override high DPI scaling behavior” and choose “System (Enhanced)” from the drop down
- Click OK in both dialog boxes and open CERF Desktop as normal.
Logging out of the CERF Desktop client is slow
Question: Why is there a delay while logging out of the CERF Desktop application?
Answer: There are two methods for a user to end their session in the Desktop client that affect the logout experience. Closing or Exiting the application is the quickest method to logout and clear memory allocated by the application
Method One: Session > Exit or Close the application
When the user closes the CERF Desktop client, their server session is immediately closed and they are completely logged out of CERF. Clicking on Sessions > Exit will close the application and log the user out of CERF.
Method Two: Session > Logout (application is not closed)
When the user chooses the Session > Logout option their session is immediately closed and they are logged out of CERF. What the user experiences during this process is a notification in the lower right of the application stating to please wait while the user is being logged out. During this process, the CERF Desktop application is clearing out a temporary memory cache that is utilized while the application is running that improves application performance. In order to allow multiple login sessions one after the other, this temporary memory cache must be purged prior to displaying the next login window.
In normal usage of the CERF Desktop application, Lab-Ally recommends completely closing the application between login sessions as this will automatically clear up memory reserved by the application and the Java process.
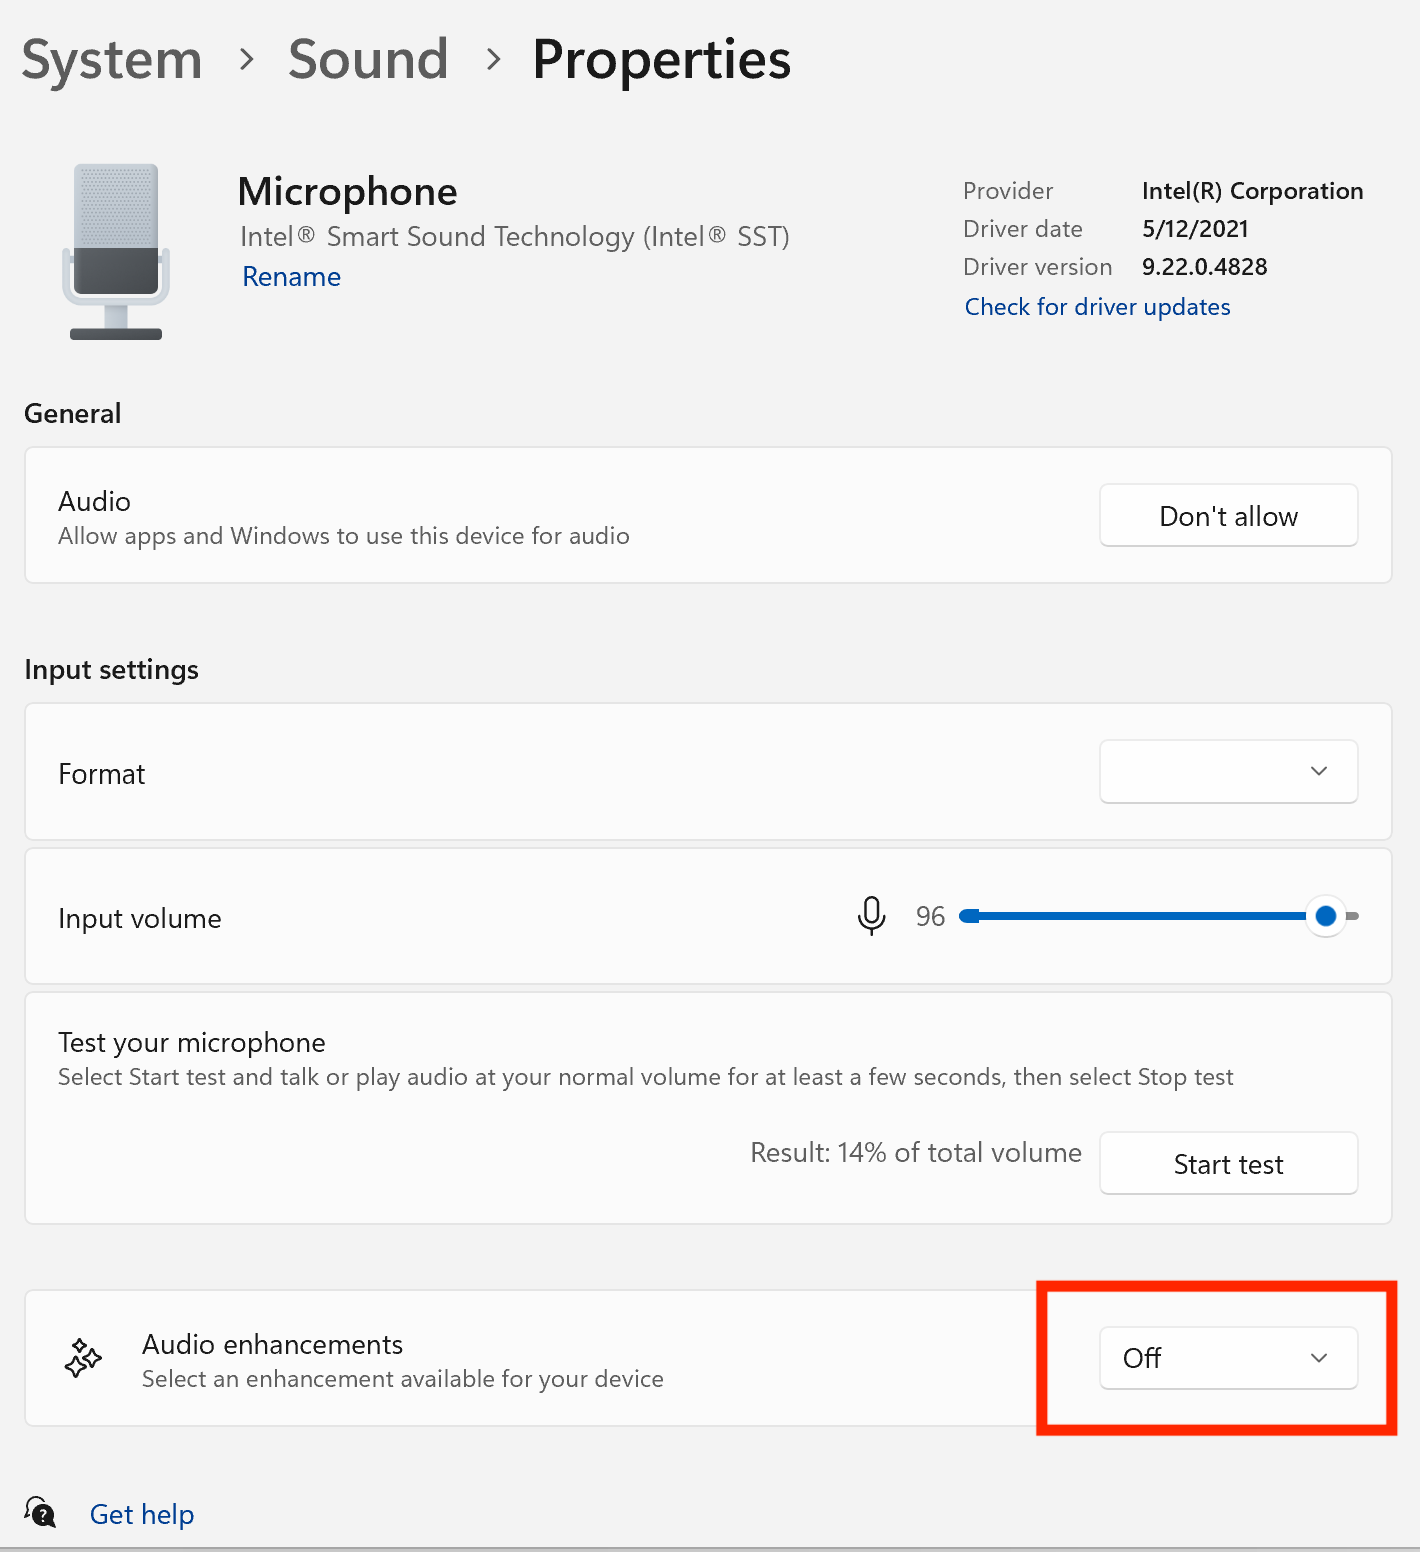
Error when creating new Audio Entry
Question:
When adding a new Audio Entry to a Notebook Page, I get an error message in the entry stating “Error Line matching interface TargetDataLine supporting format PCM_SIGNED 44100.0 Hz, 16 bit, stereo, 4 bytes/frame, big-…” How do i fix this issue?
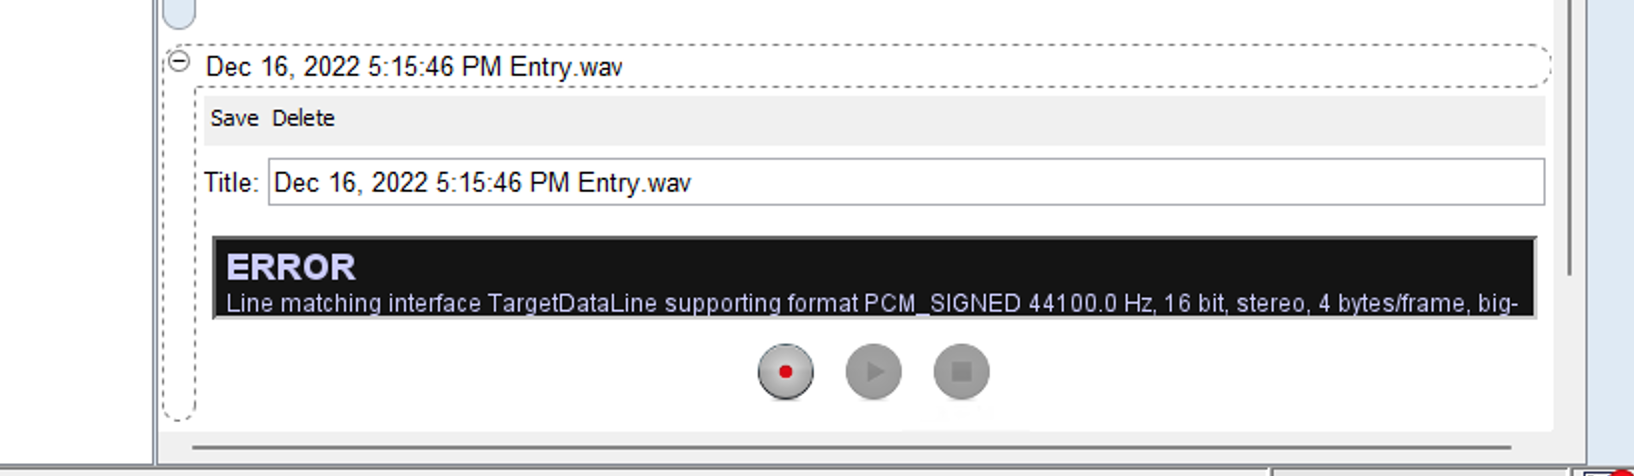
Answer:
This could be caused by an incompatible setting or driver for your computer and not necessarily an issue with CERF. First check that your microphone is enabled, plugged in and any permission settings enabled for use of the microphone. For example, MacOS asks permission for applications to use the microphone. Check your Security & Privacy settings.
For Windows 11 users, you can also check the settings for your Sound under System > Sound > Properties. Test the audio settings there, as well as check the setting for Audio Enhancements and turn them Off (or On to see if a difference).